

Module 0: Overview of the Course and Assessment
Contents
Module 0: Overview of the Course and Assessment#
Here is an overview of what you will learn in this course, which tools will be used, and how you will be assessed. This module discusses, in particular, the Tools and Programming Languages Used During the Course and the Assessment: Group Project and Oral Group Examination.
What is a Compiler?#
A compiler is a translator from code written in a source language, into code written in a target language. Typically, the source language operates at a higher level of abstraction, whereas the target language operates at a lower level of abstraction. For example:
compiling C++ code into C code (a common approach of the early C++ compilers);
compiling C code into x86 assembly;
compiling TypeScript into WebAssembly;
compiling Java code into Java Virtual Machine bytecode;
compiling F# into .NET Common Language Runtime bytecode;
…
When the source and target languages have similar levels of abstraction, we typically use the term transpiler instead of compiler.
A compiler typically performs the source-to-target language translation in a series of phases: each phase takes as input a representation of the code being compiled, and outputs another representation. This way, an overall complex source-to-target translation is broken down into simpler steps, each one having a distinct purpose.
Fig. 2 outlines the basic phases of a compiler, what they receive as input, and what they produce as output.
Note
The number of phases and nomenclature may vary between compilers; moreover, a phase can be sometimes split into sub-phases, and two or more phases may be merged into one.
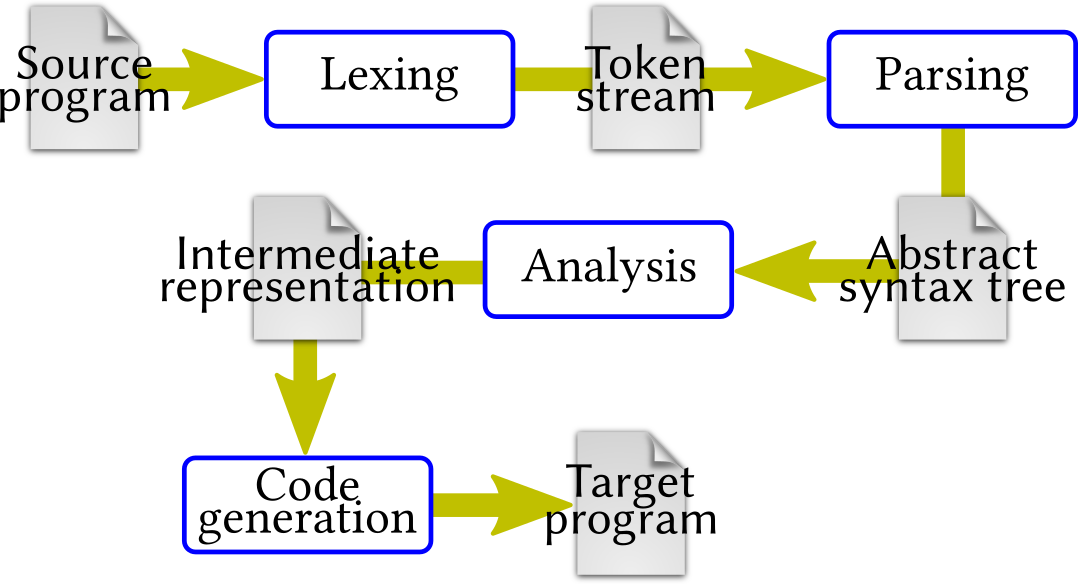
Fig. 2 Basic phases of a compiler.#
Let us explore the purpose of the phases in Fig. 2 with an example. Consider the following simple source program:
println(2 + 3) // Should print a number between 4 and 37
The lexing phase (a.k.a. tokenization) classifies groups of characters in the source program, by recognising e.g. keywords, parentheses, literal integers, operators. Recognised groups of characters are transformed into tokens, and irrelevant information in the source program (e.g. white spaces, comments) can be discarded. For example, a tokenization of the program above may look like:
PRINTLN; LPAR; LIT_INT 2; PLUS; LIT_INT 3; RPAR
The parsing phase reads a stream of tokens and applies a series of grammar
rules to reconstruct the syntactic structure of the source code, creating an
Abstract Syntax Tree (AST). An analogy with human languages is: each token
represents a valid word in a given language, and the parser checks whether a
sequence of words forms a grammatically-valid sentence. For example, the
sequence of tokens above forms the following AST, which means: there is a
top-level PrintLn expression with an argument sub-expression, which in turn
is an Addition having two sub-expressions: an lhs (left-hand side) which is
an IntValue 2, and a rhs (right-hand side) which is an IntValue 3.
PrintLn
┗╾arg: Add
       ┣╾lhs: IntVal 2
       ┗╾rhs: IntVal 3
The analysis phase checks whether a given AST is “correct”, and produces an
intermediate representation (IR) useful for further compilation. The kind
of analysis being performed, and the details of the IR, may vary between
compilers. A common scenario is: the analysis is based on type checking,
and the produced IR may be a typed AST similar to the input AST, but
augmented with type information. For example, the type-checking of the AST
above may produce the following typed AST, which tells us that the top-level
PrintLn expression has type unit, i.e., it returns a value of type unit.
Instead, the argument sub-expression is an Addition which has type int,
i.e. it returns an integer value; moreover, the lhs and rhs sub-expressions
also have type int.
PrintLn; type: unit
┗╾arg: Add; type: int
       ┣╾lhs: IntVal 2; type: int
       ┗╾rhs: IntVal 3; type: int
Finally, the code generation phase translates the intermediate representation into a target program. For example, if the compiler produces assembly code, then the program generated from the typed AST above may look like:
.text:
    li t0, 2
    li t1, 3
    add t0, t0, t1
    addi sp, sp, -8
    sw a7, 0(sp)
    sw a0, 4(sp)
    mv a0, t0
    li a7, 1
    ecall
    lw a7, 0(sp)
    lw a0, 4(sp)
    addi sp, sp, 8
    li a7, 10
    ecall
Note
The compilation process may not end here: e.g. the assembly code above may be the input of an assembler, which is a small compiler that translates assembly code into machine code executable by a CPU.
Course Objectives and Rationale#
This is a project-based course: you’ll learn how to design and extend a compiler by working on a compiler, combining theory and hands-on experience. To this purpose, we study how to compile a high-level programming language (with features found in many “mainstream” programming languages) into low-level assembly code for a real-world CPU architecture: RISC-V.
The main learning tool for this course is a small high-level programming language called Hygge (/ˈhygə/), designed for teaching compiler construction.
The Hygge language is designed to be easy to use and to parse, so we can focus on the more interesting aspects of its compilation process. You can think of Hygge as a micro-F# with a syntax reminiscent of C (see A Taste of Hygge). We will study how to translate an Hygge program into an executable RISC-V assembly program.
Due to time constraints, this course does not attempt to build a Hygge compiler
completely from scratch. Instead, we start from a skeleton (and incomplete)
compiler called hyggec. You will work on a group project to improve both
the Hygge language and the hyggec skeleton compiler, by designing and
implementing various new features (either suggested by the teacher, or proposed
by you).
The aim of hyggec is to provide an approachable starting point for the course
project: its source code is compact and contains many comments, and it is
designed to be easy to debug and extend. Moreover, hyggec provides some handy
facilities to speed up compiler development: e.g. a pretty-printer, an internal
API to create and combine fragments of target RISC-V code, and an automatic
testing framework.
A Taste of Hygge#
At the beginning of the course, we will focus on a minimalistic fragment of the Hygge programming language (called Hygge0) and explore how to compile it into RISC-V assembly. Hygge0 is little more than a calculator: it only supports variables, a few arithmetic operations, if-then-else, and reading/writing data from/to the terminal. An Hygge0 program looks like the following:
1let x = 1;
2let y = 2;
3
4if x < y then println("x is smaller than y")
5         else println("x is not smaller than y");
6
7print("The result of x + y is: ");
8println(x + y)
You will learn how to improve Hygge0 and its compiler by adding new simple programming language constructs — in particular, new operators.
After this experience, we will explore the more complete Hygge programming language (which builds upon Hygge0) and you will learn how to design and implement more advanced features to fix its limitations and expand its capabilities. Towards the end of the course, we will be able to compile into RISC-V and run some rather complex Hygge programs, like the following:
 1// Define a list type as a labelled union type: either an empty list ('Nil'),
 2// or a list 'Elem'ent followed by the rest of the list.
 3type List = union {
 4    Nil: unit;
 5    Elem: struct {
 6        value: int;
 7        rest: List
 8    }
 9};
10
11// Is the given list empty?
12fun isEmpty(l: List): bool = {
13    match l with {
14        Nil{_} -> true;
15        Elem{_} -> false
16    }
17};
18
19// Create a list of ints starting with 'start' and ending with 'end' (included).
20rec fun range(start: int, end: int): List = {
21    if (start < end or start = end)
22        then Elem{struct{value = start; rest = range(start+1, end)}}
23        else Nil{()}
24};
25
26// Compute and return the length of the given list.
27rec fun length(l: List): int = {
28    match l with {
29        Nil{_} -> 0;
30        Elem{e} -> 1 + length(e.rest)
31    }
32};
33
34// Display the elements of the given list: show the elements between square
35// brackets, with a semicolon between consecutive elements, and a final newline.
36fun display(l: List): unit = {
37    // Internal helper function to display each list element
38    rec fun displayRec(l: List): unit = {
39        match l with {
40            Nil{_} -> ();
41            Elem{e} -> {
42                print(e.value);
43                if not isEmpty(e.rest) then print("; ")
44                                       else ();
45                displayRec(e.rest)
46            }
47        }
48    };
49    print("[");
50    displayRec(l);
51    println("]")
52};
53
54// Map the given function over the given list
55rec fun map(f: (int) -> int, l: List): List = {
56    match l with {
57        Nil{_} -> Nil{()};
58        Elem{e} -> Elem{struct{ value = f(e.value);
59                                rest = map(f, e.rest) }}
60    }
61};
62
63let l = range(1, 42);
64print("The length of the list 'l' is: ");
65println(length(l));
66
67print("The elements of the list 'l' are: ");
68display(l);
69
70// Create a list 'l2' by adding 1 to each element of 'l'
71let l2 = map(fun(x: int) -> x + 1, l);
72print("The elements of the list 'l2' are: ");
73display(l2)
Tools and Programming Languages Used During the Course#
This section summarises what Software Requirements you should install to follow the course, and provides some pointers about the F# Programming Language.
Software Requirements#
To run and modify the Hygge compiler, and to use the tools recommended for this course, you will need to install on your computer:
.NET 8.0 - https://dotnet.microsoft.com/en-us/download/dotnet/8.0
Java (version 21 recommended) - https://www.oracle.com/java/technologies/downloads/#java21
Also highly recommended:
Git - https://git-scm.com
F# Programming Language#
The hyggec compiler is written in F#, and the lectures will often discuss how
some compiler feature can be implemented in F#. Therefore, it is highly
recommended to have (or acquire) some experience with F#. Here are some useful
resources.
F# home page: https://dotnet.microsoft.com/en-us/languages/fsharp
First steps with F#: https://learn.microsoft.com/en-gb/training/paths/fsharp-first-steps
Some specific F# features will be used very often:
Discriminated union types: https://learn.microsoft.com/en-us/dotnet/fsharp/language-reference/discriminated-unions
Records: https://learn.microsoft.com/en-us/dotnet/fsharp/language-reference/records
Pattern matching: https://learn.microsoft.com/en-us/dotnet/fsharp/language-reference/pattern-matching
Mapping over lists: https://bradcollins.com/2015/04/17/f-friday-the-map-function
Folding over lists: https://riptutorial.com/fsharp/example/7373/intro-to-folds–with-a-handful-of-examples
Assessment: Group Project and Oral Group Examination#
This is a project-based course with work in groups (normally 5 people).
Your goal is to design and implement features that are not initially supported by the Hygge language and compiler provided with the course materials. For the assessment, your group will need to submit:
the source code of the improved compiler where you implemented such features — including the test cases, and
a Project Report describing how you designed and implemented each feature.
The course ends with an Oral Group Examination.
You can choose between two possible project routes: the Standard Project Route or the Custom Project Route.
Standard Project Route#
You select some of the “Project Ideas” presented throughout the course, and
realise them by extending the Hygge language and hyggec compiler provided as
part of the course. The project ideas have a level of difficulty (“easy”,
“medium”, and “hard”) that will help you decide what to choose, depending on
which grade you aim at.
Important
You don’t need to implement all the Project Ideas presented during the course: for more details on how your work will be assessed, see What Grade can I Get?. You can select the Project Ideas you like, without need to request the teacher’s approval.
Custom Project Route#
Besides the standard Project Ideas discussed above, your group can propose variations, and new and alternative project ideas. Your proposals are welcome! You’ll need to talk about your proposal with the teacher and find an agreement before proceeding.
As an extreme, your group may even propose a radically different project — e.g. writing a new compiler from scratch, or start from another language and/or compiler, instead of the ones provided for the course. Note, however, that this project path is more risky: it may require a much higher implementation effort, and it may clash with the course timeline; moreover, the teacher and TAs may not be able to help you in case of difficulties. If you really want to pursue this possibility, talk about it with the teacher and find an agreement before proceeding.
Project Report#
To write the project report, you should use the LaTeX template available on DTU Learn, which contains some examples and guidelines. The individual contributions of each group member must be explained in the report, because the course grades are individual (for more details, see What Grade can I Get?).
A few recommendations for writing the report:
when you show formal rules (for the syntax, semantics, type checking…) then you may not need to write a long explanation (the rules may be enough);
when showing code snippets, try to reduce them to the bare minimum that helps you explain what you did. Instead of including long code snippets, you can refer to the relevant files and functions in your project source code.
Oral Group Examination#
The course ends with an oral group examination, with the following structure.
The oral exam will open with a short group presentation of your project. The total time will be 1 minute per group member (so, a total of 5 minutes if your group has 5 members): you should provide a brief overview of your work, and highlight the main features, challenges, and anything you deem noteworthy. When preparing the presentation, consider that the teacher and external examiner will have already read your project report: besides the overview and highlights, you can refer to it for the technical details.
Then, the exam will continue with questions to each group member. The main objective is to assess your contribution to the project work: e.g. you may be asked to clarify some aspect of your work, or discuss possible alternative approaches to what you did. You will not be asked detailed technical questions about parts of the project that were implemented by other team members. You may be asked general questions about compiler concepts (e.g. what are the main phases of a compiler, what is subtyping…).
What Grade can I Get?#
As mentioned above, the course grades are individual, and your grade will depend on which parts of the project you implement and/or contribute to. Table 1 below outlines the requirements to achieve a certain grade — but some exceptions may apply, e.g.:
creativity, good design, elegant solutions, and accurate testing are rewarded;
you may get a better grade by correctly implementing a medium-difficulty project idea, rather than poorly implementing a more difficult idea.
To achieve this grade… |
…you must implement at least… |
|---|---|
12 |
2 project ideas with “hard” difficulty from different modules |
10 |
1 project idea with “hard” difficulty, 2 project ideas with “medium” difficulty, all from different modules |
7 |
3 project ideas with “medium” difficulty from different modules |
4 |
2 project idea with “medium” difficulty, 2 project ideas with “easy” difficulty, from at least 2 different modules |
02 |
1 project idea with “medium” difficulty, 3 project ideas with “easy” difficulty, from at least 2 different modules |
Important
If you aim at a certain grade but you cannot find suitable project ideas (e.g. because your teammates have already taken all project ideas with the required difficulty), you can contact the teacher to discuss the situation and agree on a solution.
Group Work Organisation: Some Suggestions#
To succeed in your project, you will need to organise your group work. When working on a compiler, there are two common (and somewhat opposite) approaches.
Phase-oriented: each group member specialises in a compiler phase (parsing, type checking, …). When a new feature needs to be added to the compiler, the group members contribute by taking care of the phase where they are specialised.
Pros: easier organisation, because every group member tends to work on different files in the compiler source tree.
Cons: individual group members may not learn much outside the compiler phase where they are specialised.
Feature-oriented: when a new feature needs to be added to the compiler, a subset of the group (one or a few members) takes charge of it, and implements it across all compiler phases (from lexing to code generation).
Pros: every group member tends to work through all the compiler phases, and learns something about all of them.
Cons: requires more organisation, because multiple group members (working on different features) may need to modify at the same time the same files in the compiler source tree.
As a group, you can adopt the approach you prefer: one of the above, or some hybrid between the two, or some variation, or something else entirely… It’s your choice — and you don’t need the teacher’s approval to decide. In any case, the individual contributions of each group member must be explained in the project report and will determine each individual grade.
Note
If you choose approach 2 (feature-oriented), you may adopt something like the Git Feature Branch Workflow to make your group coordination smoother:
The link above mentions Bitbucket, but you can realise the workflow in the same way when using the DTU Compute GitLab service, since it supports merge requests.
Warning
Be aware that, if you choose approach 1 (phase-oriented), the lexing and parsing phases have less weight in the course assessment with respect to the other phases: therefore, as a group member, you may not want to only work on those phases. The lexing/parsing assessment weight may increase if you propose some related Project Idea (to be agreed with the teacher, see Custom Project Route).